This website uses cookies to ensure you get the best experience on our website. To read our full cookie policy please click here.
Troubleshooting
If you are seeing strange results or the instrument is behaving in a manner which you are not expecting, then please double check the user manual for your instrument as this may be able to resolve the issue. If not, here are a few simple troubleshooting guides which may help fix the problem or determine quickly if it needs to be returned to us for repair.
1140 Microseparometer
AOT Testing
Med-Lab has prepared an AOT best practise / troubleshooting guide - this is available on out USER MANUAL PAGE
1140 V Deluxe
The MK-V Microseparometer is no longer supported by the manufacturer – Emcee Electronics. Production of this Model ceased at the end of 2008 with instruments with a 6-digit serial number. 5-digit serial number instruments have been un-supported for some time as they ceased production at the end of 2000 so are at least 18+ years old.
Any instrument with a serial number 107378 or below is now not supported.
The current model Microseparometer is the MK-X instrument, the link to this product is below.
https://www.med-lab.co.uk/petrochemical/emcee/microseparometer-model-1140-mark-x
If you have an old MK-V instrument, Med-Lab offers a trade-in discount against the current model. For details of this offer, please contact our office on +44 1332 349094 or email [email protected].
1140-X Error codes
The manufacturer, Emcee Electronics, advises leaving the MKX instrument connected to the mains when not in use. In certain circumstances, if this has not been done and the instrument battery pack is flat, you may see ERR-05 or ERR-03 during a test. If this occurs, please charge the battery fully before repeating the test which may resolve the problem.
ERR-01 Syringe stalled while traveling up. Usually caused by a conflict such as a case lid not being fully open. Remove the mechanical restriction and press the reset button.
ERR-02 Syringe stalled while traveling down. Usually caused by one of several errors such as leaving the syringe plug instead of the filter attached to the syringe, a large misalignment of the piston centering causing a load due to the angle when the syringe is pressed sideways or foreign material can clog the syringe hole. Remove the mechanical restriction and press the reset button. If the stalled error cause can not be determined the operator should contact customer service.
ERR-03 This Syringe drive was either fast or slow by more than 2 seconds which is outside of approved limits for a valid test. Usually caused by a large misalignment of the piston centering. If error repeats itself the operator should contact customer service.
ERR-04 The Turbidimeter could not auto adjust to 100. This error is caused by either a turbidimeter component failure or a sample too opaque to allow a sufficient light transfer. Under some conditions the error could be caused by failure of the operator to insert the vial and/or reference sample. The instrument will try for 30 seconds to balance the light intensity for a 100 reference level. If after that time it cannot meet the requirement it will sound an audible alarm and display ERR-04. If error repeats itself the operator should contact customer service.
ERR-05 The Emulsifier Speed is outside of acceptable limits. The speed is self adjusting and the error is usually caused by a faulty component. If error repeats itself the operator should contact customer service.
ERR-06 The battery is not charged sufficiently to run a test. The battery is tested during the first clean and if the charge is too low the test will be stopped. A ‘LO BAT’ indication identifies the need for AC power to recharge the batteries; however the battery should have sufficient charge to finish the test. The LO BAT indication will reappear at the end of the test to remind the operator to apply charging power.
1152 Conductivity Meter
Handling the 1152 - Best practise
Day to day handling of the 1152 instrument with fuel may cause the buttons and / or display to fail if liquid is introduced to these areas over time. If this occurs, the display and / or buttons can fail prematurely requiring repair / calibration of the instrument which is not covered by the manufacturer warranty. As a ‘Best Practise’ Med-Lab advise reducing fuel contamination to the instrument wherever possible to extend functional life. Good housekeeping, good practise reducing spillage and wiping hands where possible before handling the instrument are all suggested to achieve this.
Probe Cleaning Procedure
A dirty probe can be diagnosed by seeing 0 without the probe connected but an offset when the probe is connected.
If this is the case, it should be cleaned as follows. Using Isopropyl Alcohol / Toluene, the probe should be thoroughly rinsed and allowed to dry before re-testing for zero. The recommended procedure is to rinse the outer and inner electrode with cleaning solvernt (a small beaker or bath can be used or a squeezable bottle ) to the same level used when testing (just above the level of the holes in the outer electrode). Beware getting the top / neck of the probe and the connector wet from fuel / solvent as this can be particularly difficult to dry correctly. Once cleaned, the probe can be dried using an air line or placed in a warm environment to speed up drying.
Incorrect 0 or CAL Value
The 0 and CAL values should only be checked WITHOUT THE PROBE CONNECTED as there is often fuel left on the probe which effects the readings. If the readings are correct without the probe but are wrong with the probe connected then the probe is probably dirty and needs to be cleans (see probe cleaning section for details). If the readings are incorrect without the probe connected, then please read the section below about setting the 0 and CAL correctly.
Set 0 and CAL / Changing to a different Probe Number
Insert a small screwdriver into the hole marked ZERO while depressing the 'M' button. Adjust the control until the display reads 000 +/- 001.
While depressing the 'C' button, insert a small screwdriver into the CALIBRATE hole and adjust for 10 times the probe calibration number +/- 002.
Unable to read '0' when pressing 'M' button (in Air)
A common problem with the 1152 is not being able to read 0 when the ‘M’ button is pressed and the probe connected whilst the probe is not in fuel. First you need to make sure you can read 0 without the probe connected and that the number seen when ‘C’ is pressed is a number 10 x the probe number (eg 420 with a probe number of 42). If you do not see 0 without a probe, follow the Set 0 and CAL / Changing to a different Probe Number procedure above.
If this is complete, and when you connect the probe you see a value > 0 when pressing ‘M’ then the probe and / or the probe BNC connector(s) may need cleaning.
Reading '0' when pressing 'M' button (Probe is in fuel)
Sometimes the 1152 can read '0' instead of a higher value which represents the conductivity of the fuel being sampled when the 'M' button is pressed. Firstly, check if you see 10xProbe number when pressing 'C' button without the probe attached. If you DO NOT see this, proceed to the section below Reading '0' when pressing 'C' button. If you read 10xProbe number but still see '0' when measuring fuel, there may be a problem with the probe and / or the connector.heck the connectors on both the instrument and the probe. Sometimes the inner electrode on the probe can drop and the connection to the instrument is not made. Try pushing the inner electrode back up so that the tip is visible on the BNC connector on the probe. The BNC connectors can also be damaged or the tip of the inner electrode can be broken. If this is the case then the instrument needs to be returned to Med-Lab for a repair and Calibration.
Reading '0' when pressing 'C' button
Sometimes the 1152 can read '0' instead of 10xProbe number when the 'C' button is pressed. This is often caused by one of the circuit boards inside the instrument working loose and can be easily fixed.
1) Remove the 4 screws holding the back plate exposing the battery housing at the top of the meter.
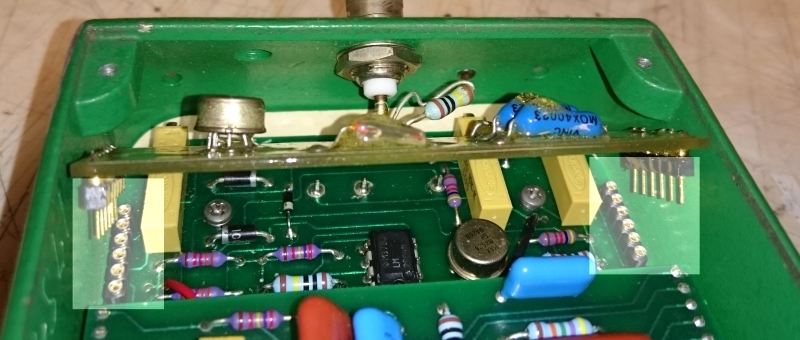
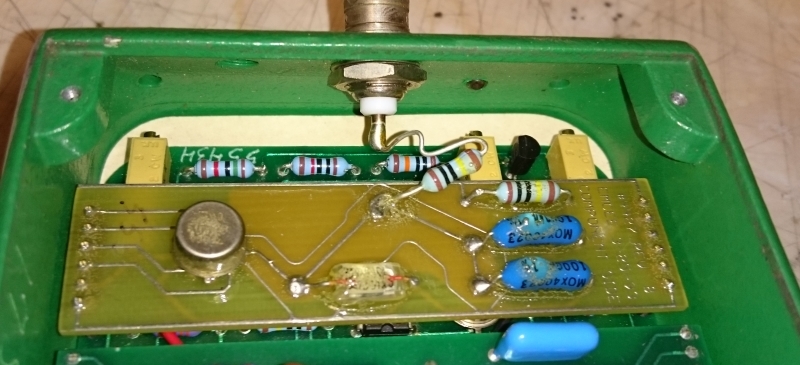
2) Check the alignment of the small circuit board at the bottom which is linked to the probe connector on the case. It should have a row of connectors at each end of the circuit board which must be correctly connected.
See 1st picture - the connectors on either side are highlighted which both need to be aligned correctly.

3) Adjust and re-connect each row if required to match the 2nd picture.

4) Replace back panel and check zero and calibration.
Replacing the Battery (1152)
Text taken from the 1152 user manual (section 9)
9.0) BATTERY REPLACEMENT
9.1) The Model 1152 Conductivity has an internal battery checking circuit. If batteries are weak the meter will read for a short time and shut itself off. If batteries are too low the unit will not turn on.
9.2) When battery replacement is indicated remove the 4 screws holding the back plate exposing the battery housing at the top of the meter.
9.3) Remove the 2 screws on the battery housing and set the housing cover to one side (Figure 7).
9.4) Observe the polarity markings and insert three new batteries as shown in Fig. 7. Battery replacement must be 3 x Energizer No. A544 Alkaline, 6v each any other battery replacement will invalidate the Intrinsically Safe Rating.
9.5) Replace back panel and check zero and calibration.
1153 Conductivity Meter
Meter reads a conductivity of '0' measuring fuel (when known to be >0)
There may be a poor connection between the main electronics of the instrument and the probe. This can be easily checked by removing and refitting the probe following the instructions below.
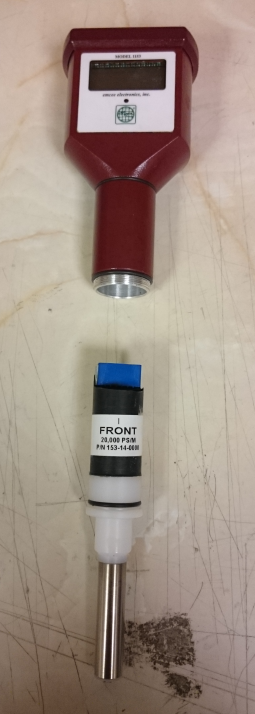
1) Remove the outer electrode by unscrewing by hand until the outer electrode is detached. (Fig1)
2) Gently pull the exposed probe downwards which should pop out (Fig2)
3) Check the blue connector on the top of the probe for any damage or debris and remove if required.
4) Refit in reverse noting the probe alignment and the 'FRONT' label which is aligned to the button.
5) Re-test to see if the instrument measures correctly.
|
Fig1
|
Fig 2
|


